How to start creating 3D printable models?

There are 2 types of 3D Modeling programs : geometric modeling programs and organic modeling programs,
Example for geometric modeling programs : Sketchup software , example for organic modeling programs : Blender.
Why use Sketchup ?
Sketchup is a great option for beginners who are new to 3D modeling and 3D printing , easy to learn , has a great community of users that you can ask for help .
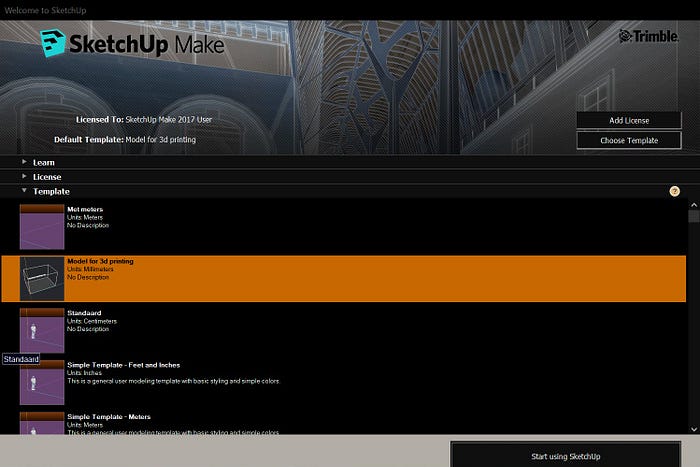
First , download Sketchup Make 2017 ( www.sketchup.com)because it is free , Once you have installed it , you will see a screen as shown below:
1- Choose Template 2- Model for 3D printing


The Sketchup interface :

The STL file format is the most commonly used file format for 3D printing.
To install the extension, navigate to Window / Extensions Warehouse and sign in with your Google account. Search for “STL”

There are 2 essential extensions that you will have to install it :
Solid Inspector ,CleanUp3 : error correction features to ensure your designs are 3D print-ready .
How to export and import STL files ?
File /Export STL
Binary and ASCII STL files are identical for the most part, but binary files are compressed and therefore much smaller and easier to work with

File /Import
Choose STL file , click options
Then check Merge coplanar faces,set the units to mm

The 3D printing process:
Creating a 3D model then exported it to STL file , then send the STL file into slicing program which creates g-code in which the 3Dprinter can understand.
Examples for slicing programs: Cura ( free, for beginners & advanced users) , Prusaslicer (free,for beginners & advanced users) , Simplify3D($150,for beginners & advanced users) ,Octoprint(free,for intermediate & advanced users) ,Slic3r (free,for advanced and professional users).
Hint: You can fix your 3D model from any errors that would prevent your design from being printable through the slicer like prusaslicer:
Right click on the design then choose ( fix through the Netfabb).

Exercise : How to create a book holder?


1- Draw a rectangle on a work plane with the dimensions shown below then Extrude it (using push & pull tool)with 40 mm.
After that triple click on the model & Right click , press Make group


2- Draw another rectangle 150X172 mm as shown below then Extrude it (using push & pull tool)with 50 mm after that triple click on the model & Right click , press Make group

Select the 2 boxes and align their centers (using extension Align tool )/OR You can leave space 7mm from the 2 sides , raise the orange box 4mm above the work plane . And turn the inner box into a hole using difference tool (using extension Bool tool 2 ).

Mark the dimensions using the ruler tool as shown below

Draw a box with the dimensions below , place it at the distance we determined using ruler tool as shown above and triple click on the box , use push & pull tool to increase the width or use scale tool so that it gets out of the surface of both sides of the holder then turn the box into a hole using difference tool.


Draw the back of the book holder by drawing a triangle with dimensions as shown below then triple click to choose the whole shape & right click ,press (make group) then Crtl +move tool to make a copy .

Make sure that each object is in a group.
Set each stand at a distance 32 mm from each side .

Make all parts one object using union tool (extension BoolTool2)

Rotate the book holder to the right by 20 degree

Removing the front frame :triple click on it so that you can edit group then Use push & pull tool to delete the sides of the frame as shown below.

Draw a box and resize it to make it longer & wider than the book holder as shown below.

Extend the book holder downwards a little bit (using push & pull tool)so that you can subtract it from the box using difference tool (boolTool 2) .

Finally ,Subtract the book holder from from the box using difference tool and trim all parts of the holder found below & now we have our bookholder. Decorate it with a word or with a shape.

Decorate your book holder with your preferred shape (for example bunny/butterfly shape from website www.flaticon.com)

Save the image then import it in Sketchup and start tracing using plugin called Bezier Spline (www.sketchucation.com) as shown below which draws a variety of polylines.

Trace half of the butterfly then mirror the other half using mirror plugin (www.sketchucation.com)

Give thickness to your shape then rotate it to match the angle of the holder.

Then check that your design is solid ,free from errors and ready for 3d printing using Solid Inspector extension .
At last open your model in your slicer program & Happy Printing :)


